MOCHI DONUTS | Matcha & Sweet Potato

Ingredients:

  • 2 cups sweet sticky rice flour (mochiko)
    • 1/4 c of this will be used in starter dough
  • 1/2 cup milk
    • + 2 tbsp milk for starter dough
  • 3 tbsp melted butter
  • 1/4 cup sugar
  • 1 egg
  • 1 tsp baking powder
  • 1/2-1 tbsp matcha green tea powder
  • 1 small purple Okinawan sweet potato


Instructions:

  1. To make the starter dough: Mix together 2 tbsp of milk and 1/4 cup of rice flour and microwave it for 30-45 seconds until it becomes slightly opaque. While researching how to make a basic mochi dough for this recipe, I came across several recipes that suggested to use a starter dough to act like the “gluten” that allows the dough to be elastic. 
  2. Combine the rest of the rice flour (1 3/4 cups), milk, butter, sugar, egg, and baking powder and mix until thoroughly incorporated. Add the starter dough and knead. If you have a mixer, use the dough hook to knead the mixture until you reach a soft, formed dough.
  3. If you plan to make plain doughnuts, roll the dough out flat and use round cutters to make desired doughnut shapes, or as I did in the video, divide into logs and manually form the doughnut shapes.
  4. To make different flavors, divide the dough accordingly.
    1. Matcha Flavor: Knead in 1/2 to 1 tbsp matcha green tea powder to a portion of the dough until combined.
    2. Sweet Potato: Mash sweet potato, add splash of milk and knead in portion of dough until combined.
  5. Canola oil or any vegetable oil. If you use a wide pan like I did, the oil should be about 1 inch. The smaller the pan, the less oil you need to heat up. So if you’re making a small batch, use a smaller pan instead. Fry the doughnuts and enjoy!

Hawaiian Garlic Butter Shrimp Recipe

IMG_0122

Wow! I haven’t been on this site in over 4 years! The feeling of nostalgia is definitely kicking in as I read my old posts and recipes. I even smiled reading my bio because it’s been a long time since and so many things have changed. I was surprised I even remembered my password logging on here, ha!

What’s new? I’ve recently started a Youtube cooking channel as a hobby and I wanted to link it back to this website, where you could say it all began. I will post the full recipes to my videos on here.  I’ve only made one so far, and  as the title suggests– Easy HAWAIIAN GARLIC BUTTER SHRIMP is definitely worth a try.

If you’re from Hawaii, you’ll know how long the lines get at Giovanni’s and Romy’s for them garlic shrimp. It’s one of those dishes that I honestly crave every month so I decided to try and create my version of it, which I will share below!

IMG_0123.JPG

Ingredients:

  • 2 tbsp olive oil
  • 2 tbsp unsalted butter
  • 1 lb.  shrimp, cleaned and deveined. Head-on fresh shrimp will work as well.
  • 6 large garlic cloves, minced.
  • 1/2 tsp paprika
  • 1 lemon (juice)
  • 1/2 cup shrimp stock (from boiled shrimp heads) or opt. chicken stock/ splash of white wine. 
  • Garlic salt, pepper to taste

Optional: chili pepper flakes, chopped parsley for garnish


Instructions:

  1. Wash shrimp with cold water thoroughly, clean, and devein. Remove the shrimp head by twisting at the base and then set aside in a sauce pan. With scissors, cut along the spine and remove intestinal tract with a toothpick or your fingers.
  2. Boil shrimp heads with 3/4 cups of water on high heat until liquid is reduced by half. Skip steps 1 & 2 if the shrimp is already de-shelled and cleaned.
  3. Heat pan to medium and saute olive oil and garlic until fragrant and slightly golden. Add butter next.
  4. Add the shrimp, garlic salt, pepper, paprika. Reduce heat to low so that shrimp will not overcook.
  5. Pour reduced shrimp stock and mix together. You may have to remove the shrimp if the sauce is not to desired consistency because shrimp cooks quickly.
  6. Let the sauce thicken and reduce, add lemon and salt to taste. Transfer the shrimp back to the pan, coat, and serve.


*If you did not use shrimp heads to make stock, a splash of white wine or chicken stock can be substituted.

That’s it! What I love about cooking using this method is that the garlic really cooks down, caramelizes, and almost becomes the sauce. That, mixed with butter is truly so delicious!

**In the video, I added chopped chili peppers and it was so spicy! ABORT ABORT on the chili! If you like it spicy, add some sriracha instead! 🙂

Refreshing Mint Sweet Tea

ImageA delicious and refreshing sweet tea iced drink that is perfect for hot summer days! Super easy and quick to make using ingredients you can find at home. I’ve been making this a lot these days because it is just blazing hot here in Hawaii and because my mom constantly requests that I make it. I infused the tea with mint just ’cause I have a mint shrub in my yard. You don’t have to use it, but I recommend that you do because it gives the tea a great flavor and that cooling sensation that you can’t get anywhere else. My mom also planted lavender, so I took the liberty of using that as well! And let me tell ya– it is seriously delicious. The lavender resonates throughout and soothes the senses giving it a whole ‘nother flavor profile. Will definitely be using it again! Anyways, off to the recipe!

Image

ImageIngredients

5 cups of water

1 cup of sugar (raw, granulated white– whatever sweetens your cup of tea. Ba Dum Tsh!)

3 Lipton tea bags

1 cup fresh mint tea leaves

Optional

1 (stem/bundle) fresh lavender flowers or 1 tsp dried lavender

Image

Instructions

1. Bring 5 cups of water to a simmer in a pot and add in the sugar to dissolve.

2. Turn off the heat, add tea bags and let them steep for 10-15 minutes. You can even leave it there for an hour if you’d like!

Image3. Add the mint leaves and lavender– none, one, or both and let it sit for a few minutes to infuse the flavors.

4. Transfer to a pitcher and fill with water to desired sweetness. It will be very sweet if left as is, so  I recommend diluting it with cold water to lessen the sweetness. An additional 2 cups of water is perfect for me!

5. Refrigerate! Or pour it over ice, garnish with a mint leaf, and enjoy!

DSC_0012

Also, if you’d like a milky consistency, add a little evaporated milk or condensed milk and ta-da! MILK TEA! I love both versions!

Image

Enjoy!

Filipino Leche Flan

A staple dessert dish in the Philippines is leche flan, a creamy custard that I’d say is most comparable to creme brûlée. After telling my aunty, who lives in the Philippines, of my noble but catastrophic attempt at making this custard, she laughed at first, but later insisted that I learn her technique in making this dessert before I left for Hawaii. It’s so simple.

Image

Ingredients

Custard

12 egg yolks

1 can or 12 oz. condensed milk

1 can large evaporated milk

1 tbsp. fresh calamansi juice or lemon juice (any citrus, really)

1 tbsp. vanilla extract (optional)

Caramel

3/4 cup sugar

2 tbsp water

Image

Instructions

1. In a saucepan, heat water and sugar on low-medium. When sugar is dissolved and golden brown, quickly pour the sugar into each aluminum ramekin and spread evenly by tilting it using tongs (because it’s extremely HOT!). You don’t have to use the container I used– a porcelain ramekin (which is more widely used here) will do the job!

Image

2. Separate the yolk from the white by cracking the egg open, transferring it to your hand, and ever so carefully juggling the yolk so that the white will fall in between your fingers. Do this 12 times.

3. Whisk the egg yolk, condensed milk, evaporated milk, and calamansi juice in a bowl until smooth. Add vanilla extract.


Image

4. Strain the custard mixture using a fine sieve to get rid any undissolved particles. This is extremely important in order to have a very smooth custard.

5. Transfer evenly into the ramekins, cover with aluminum foil, and place in a steamer for 45 minutes. Make sure the steamer is boiling at medium to low heat.

Note: If you don’t have a steamer, you may bake it in a water-bath inside a pre-heated 325 degrees oven. Basically, you fill a large tray about half way with water and place the ramekins on top.

6. Check to see if it’s done by pressing gently on the top of the custard and if it’s firm and a little bouncy, it’s perfect. You do not want to over cook these! They become hole-y inside. After, leave to cool and when ready to serve, just go over the sides with a knife, put a plate over it, and flip!

Image

The caramel should be melted on the bottom and slide off the sides of the flan when flipped creating this pool of golden saucy goodness.

Image

I went a little fancy for the photoshoot. I cut out a squiggle (“S” shape) on the container instead of cutting around the perimeter. This gave it an oblong Yin and Yang-esque shape. I only used the “Yang” part, as seen in the picture. Then, I carefully arranged segmented oranges (which were extremely sour!), and put some candied orange peels and a sugar “heart”on top (except the bottom of the heart broke off).

The orange peels seriously tasted like Fruit Loops.

Image

Hope ya’ll try this one. Feel free to ask me any questions!

Happy eating!

Pistachio Crusted Shrimp with Li Hing Sauce

Image

I made these about a month ago, around the same time I moved back to the countryside… Unfortunately, I lost the recipe for it! I will definitely make these again, once I get my hands on some pistachios. Until then, here’s some food porn for ya’ll.

Image

If you guys aren’t aware, li hing mui is very popular here in Hawaii. It’s a salty dried plum that is incredibly addicting.

Image

Image

Green Tea Latte

You know you’ve stayed at Starbucks for too long when your hair starts to smell like coffee beans. Don’t get me wrong, some people actually enjoy that scent in their scalp, but I’m not a big fan of coffee. I would actually prefer smelling like green tea. I looooove everything green tea, so when I go to Starbucks, I usually get their green tea latte. It’s my absolute favorite!Image

I’ve made this drink several times, adjusting here and there to match the original. I think this is pretty close.

Ingredients

1/2 cup water

1 cup soymilk

1 teabag of green tea

1 teaspoon matcha green tea powder 

2 tbsp of sugar or agave nectar (to taste!)

1 dash of vanilla extract

Whipped cream (not optional)

Image

Instructions

1. In a saucepan, heat water and sugar on low-medium. When sugar is dissolved, put the tea bag in and let it steep for a couple of minutes. Remove tea bag.

2. Sift (optional) the matcha powder into the saucepan and whisk until fairly dissolved.

3. Add soy milk and vanilla extract and continue whisking. 

4. When milk starts foaming, turn off heat and transfer to a glass jar. Refrigerate until cool. Serve cold WITH whipped cream. 

Image

DO NOT dust with matcha powder like I did, unless you like bitter whipped cream. I did it mostly for aesthetic purposes. Image

ImageIt pairs well with cookie-brownies (as seen in the pictures).

Enjoy!

Kim Chee Fried Rice

Fried rice is practically my go-to meal whenever I’m hungry and there’s left-over rice in the fridge (which is seldom because living in a Filipino household, I eat rice at least 3x a day). It’s a very simple dish to make because, I mean– you can’t really go wrong with tossing a bunch of ingredients in a pan with rice (don’t quote me on that).Image

Image

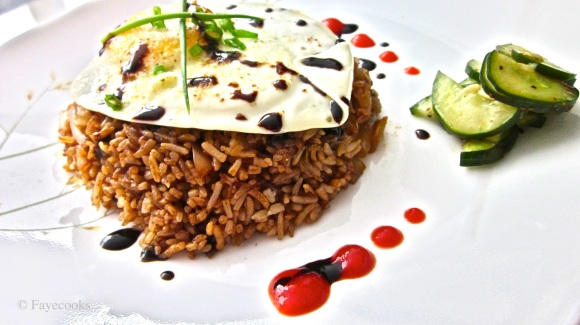
Nevertheless, I love making fried rice. From all the years I’ve been experimenting with food, I think I have enough fried rice recipes to make my own cook book (yeah, right).

Anyways, what I have here is a recipe that I’m still trying to perfect. I mean, I think it tastes really yummy– not the usual way that Koreans make their kim chee fried rice (I’ve asked a few of my Korean friends how they make their version), but flavorful nonetheless. It’s very simple to make, and if you’re a fan of spicy, I think you’ll enjoy my version of this dish. 

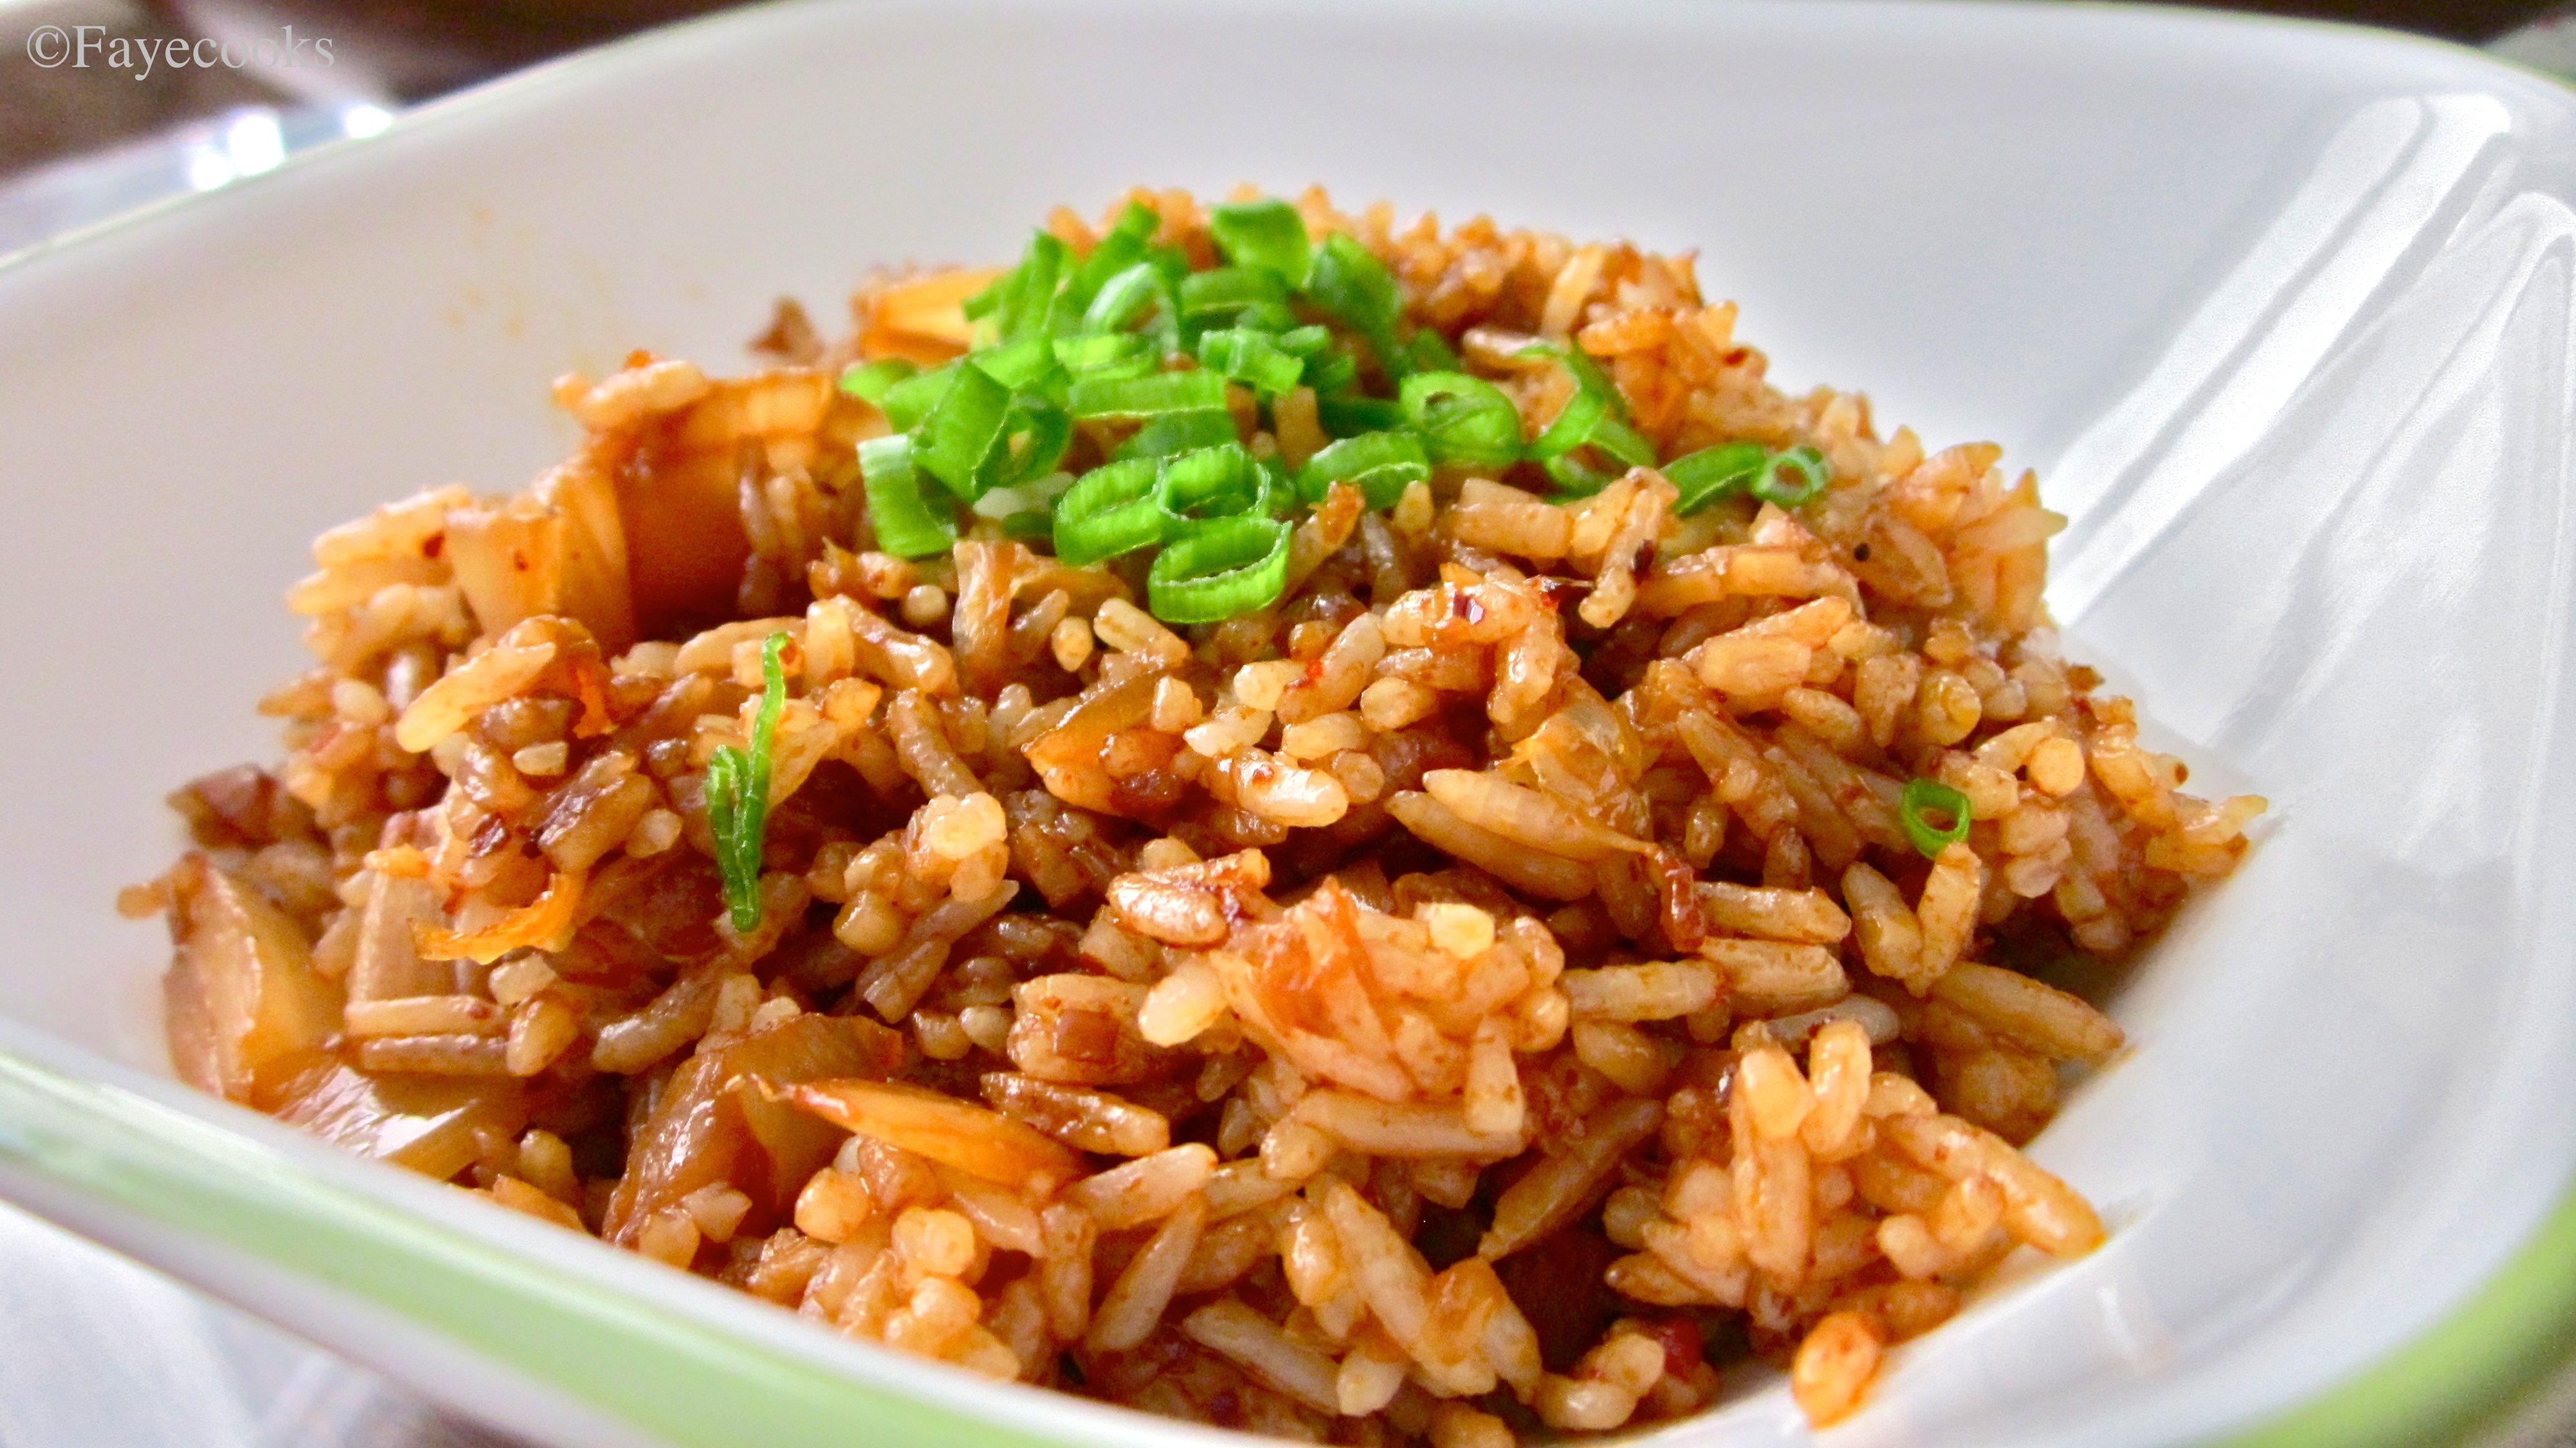
Kim Chee Fried Rice, everybody.

Image

Ingredients

2 tbsp. butter

1 tbsp. minced garlic

2 tbsp. finely chopped onion

1/2 tsp. Korean pepper flakes

1/2 cup chopped kim chee

1 cup cold, preferably day-old white rice/ or brown.

1 tbsp. ketchup

Sauce

2 tbsp soy sauce

1/2 tbsp. sesame oil

1/2 tbsp sriracha (or even less if you don’t like it spicy)

Little salt and pepper to taste

Chopped green onions for garnish

Image

ImageImage

Instructions

1. Heat a pan with a wide bottom to medium heat. Melt butter and add the garlic, onion, and Korean pepper flakes until soft and fragrant.

(I’m a pescatarian-vegetarian, so I don’t eat any chicken, beef, pork, etc.) If you’re a normal meat-eating person and happen to have SPAM or bacon on hand, please feel free to toss em in there! (In doing so, yours will probably taste better than mine! :)) 

If you do plan on using bacon, I suggest you start off by rendering the fat which is easily done by adding a splash of olive oil to the bacon in the pan, and letting the heat just melt off the fat. If you do this, please omit the butter. 

2. Add kim chee and adjust setting to medium-high heat. Continue sautéing vegetables. I usually like to add mushroom to this also, but didn’t have any on hand. I think it gives it a really nice flavor. Button mushrooms or even shiitake will do, just make sure you chop em’ up real good.

3. To make the sauce, in a small bowl, mix together soy sauce, sesame oil, and sriracha. If you do not like yours overly spicy, please go easy on the sriracha! 

4. When the vegetables look like they’re about done (you will be the judge of this), throw in the sauce and keep sautéing. Let it reduce just for a little bit, then add the rice.

5. Make sure to keep constantly mixing and incorporating the rice to the sauce! Your goal is to turn all of the white rice kinda orangey. 

6. Taste it, and adjust! Add salt and pepper if necessary.

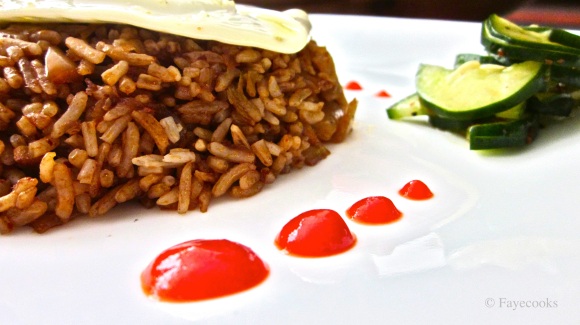
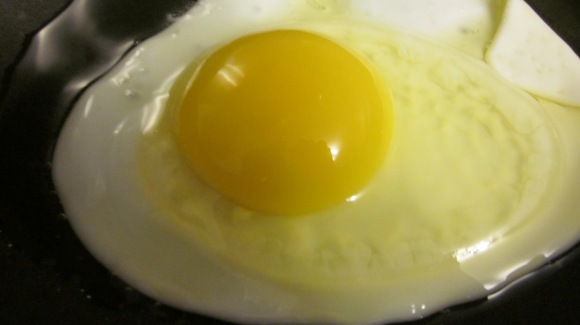
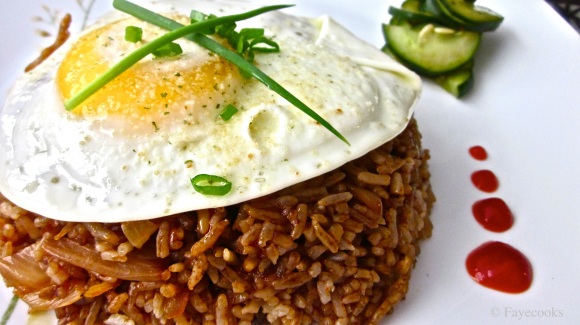
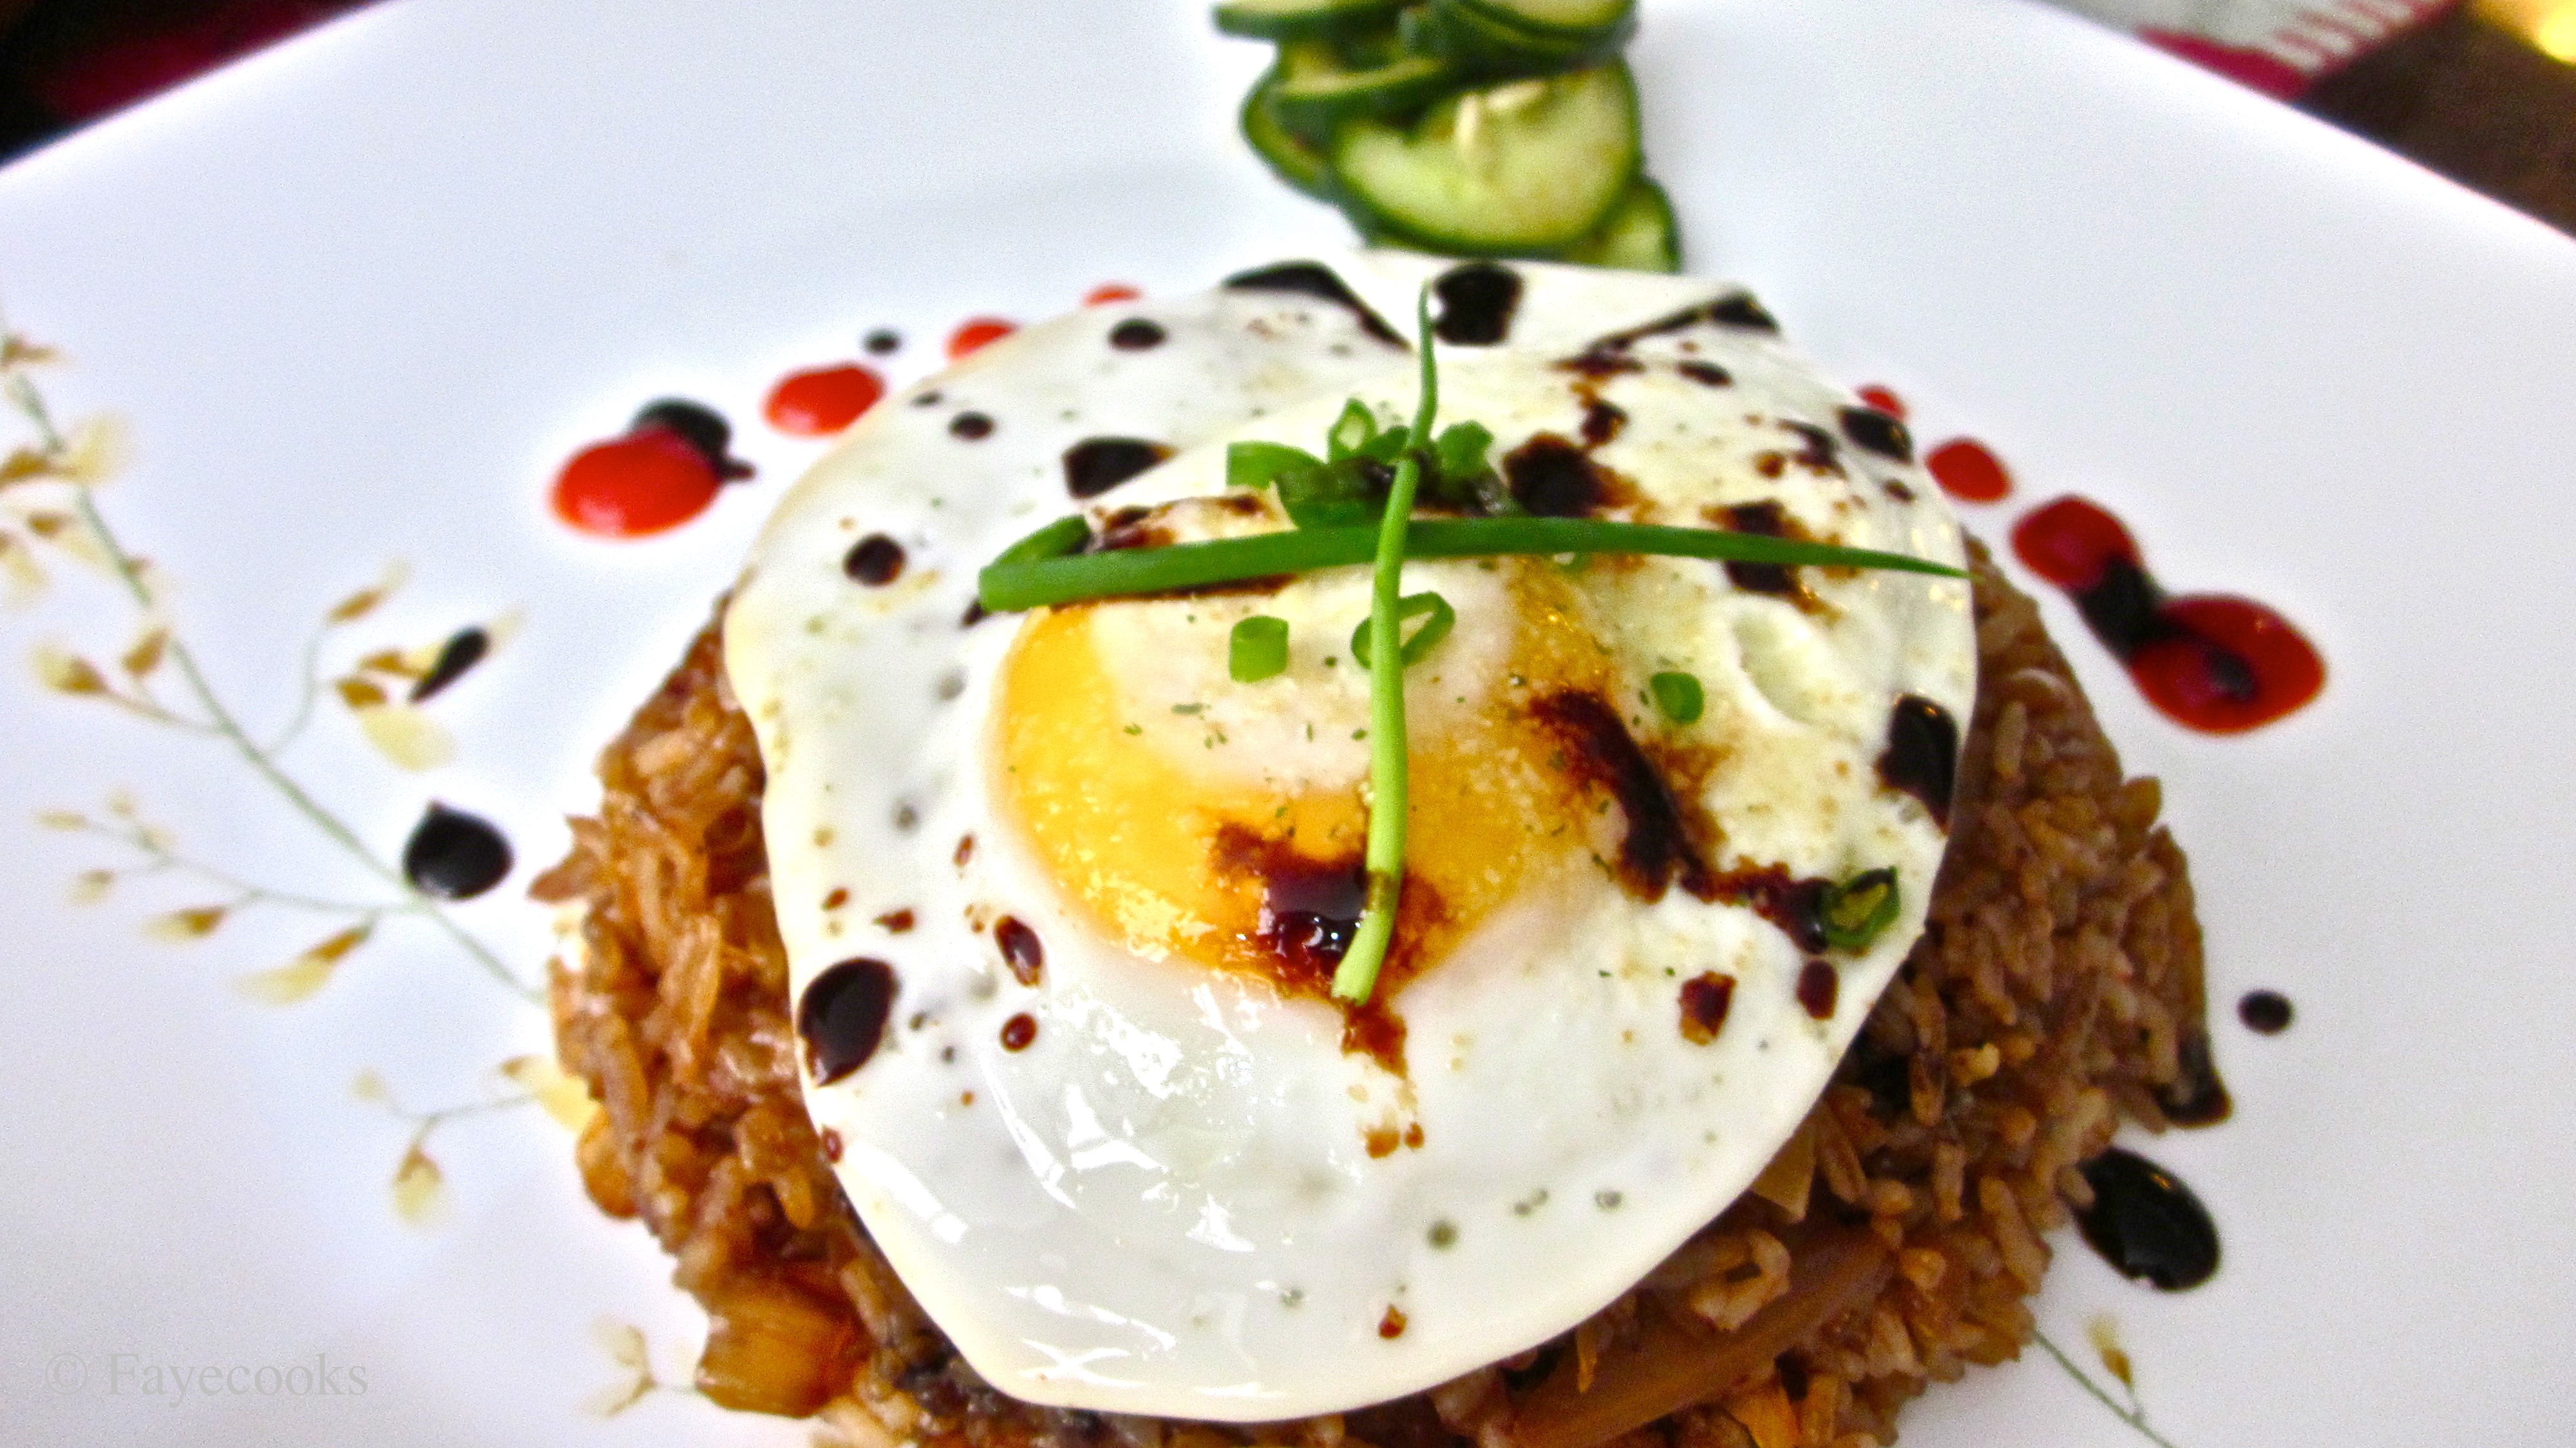
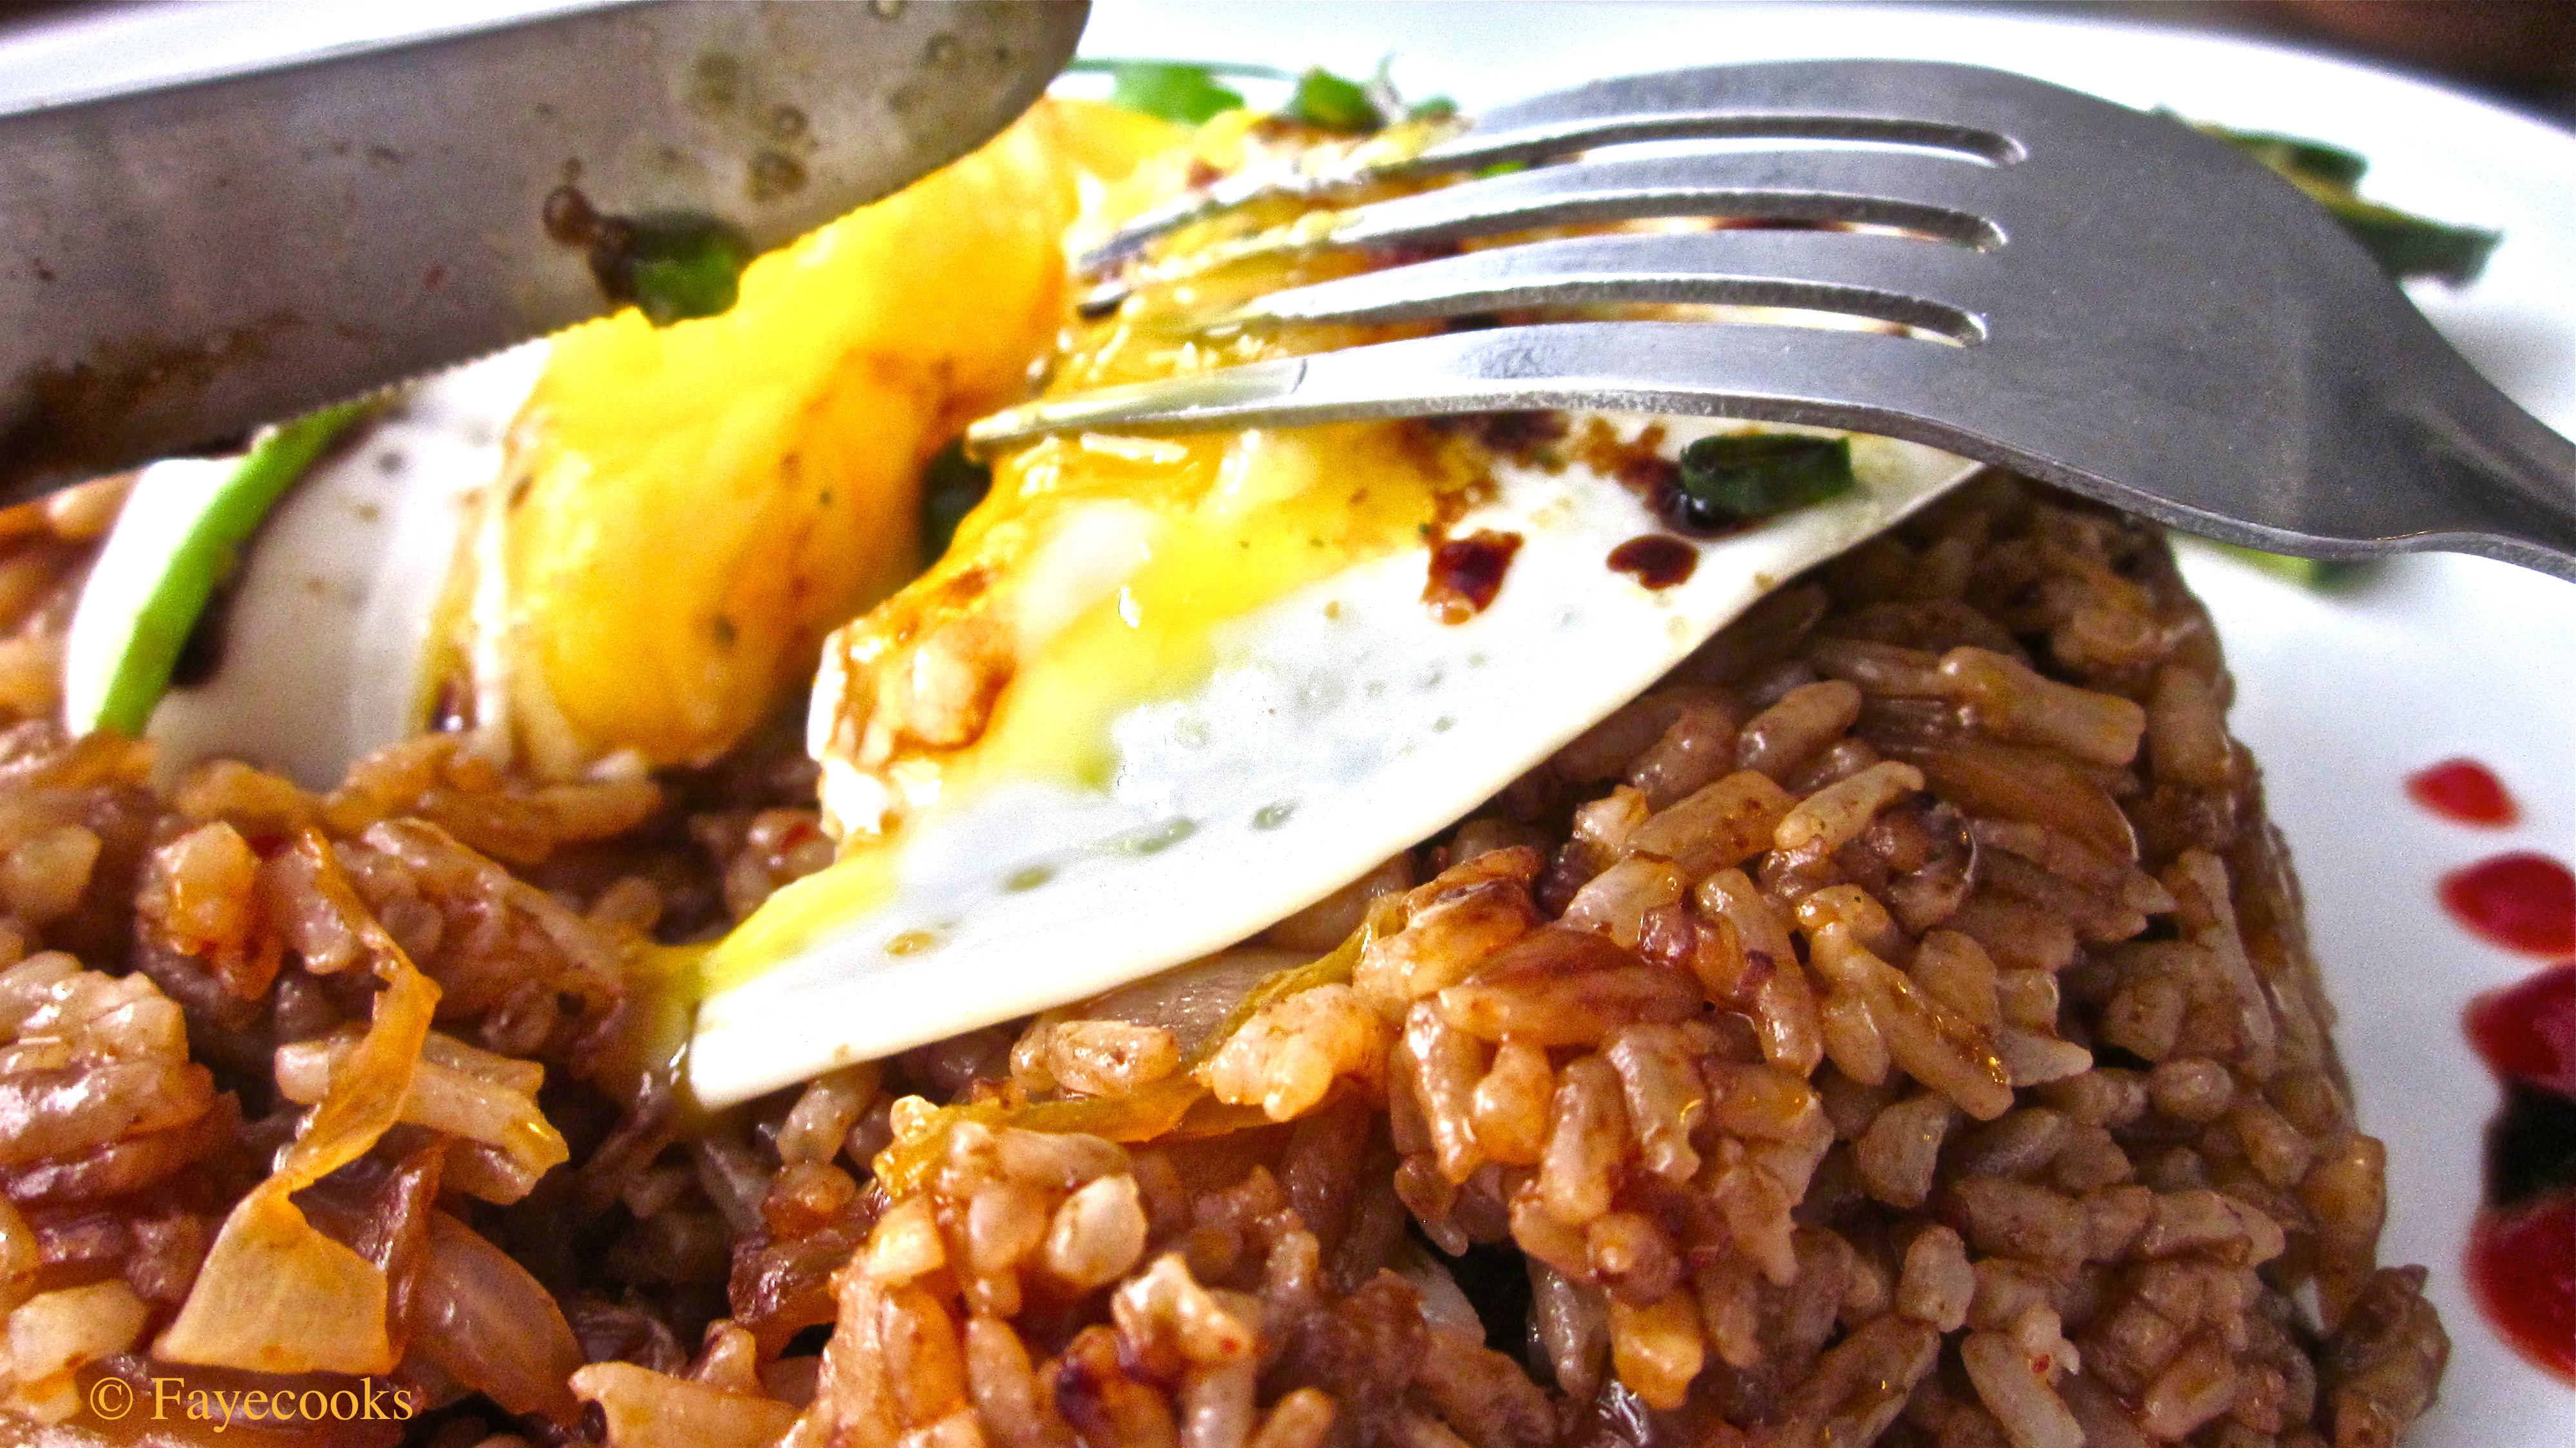
7. If you want, fry an egg and put it on top! Garnish with green onions, sriracha, etc.

Image

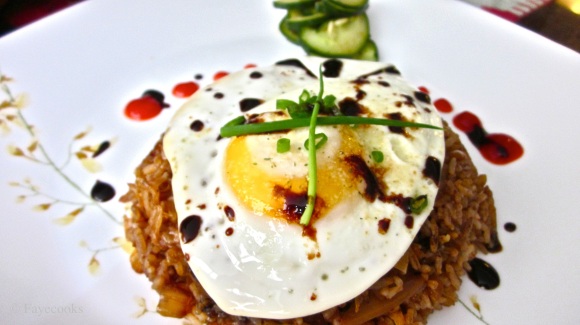
I felt a little Iron Chef-esque today (as you can tell from the pictures). Normally, I would just serve this on a styrofoam plate or just eat it straight from the pan. Although, if you’re wondering, I molded the fried rice using a bowl and flipped it over the plate. I put the egg on top, added a little garnish of green onions, dotted sriracha on the sides, and added pickled cucumbers that I made the day earlier. The hoisin sauce (black splatters) is totally optional. I personally didn’t like it on there. I just thought it looked good. 

Image

Image

So I think I’ve said it all! If you have any questions, feel free to leave a comment!

Happy eating!

Nutella Pistachio Brownie Bites

Aside from cooking savory foods, I also love love love to bake! Baking is a great stress reliever and it definitely helps me to get my mind off of things. Something about crushing garlic, melting chocolate, kneading dough, or sautéing vegetables allows me to go into a state of meditation and have that anxiety just melt away (like the chocolate). Today was one of those days that I just needed to relieve stress. So I experimented a bit and made, as the title suggests, something with Nutella.

Image

I actually had half of the work load done for me, since Nutella is soooo decadent in and of itself! So if you’re a pistachio lover, you may like this recipe for the texture and that small hint of pistachio flavor, but the chocolate-hazelnut deliciousness practically overpowers everything, which I’m not complaining about!

Enjoy~

Note: I think half of the fun in making these cooking blogs is the photoshoot I do along the way. Here are some of the good ones!

Image

Image

^ This was the hardest part for me; Made me realize that I need to invest in an ice cream scoop.

Image

Ingredients

1/4 cup butter (if unsalted, add a pinch of salt)

1/4 cup white, granulated sugar

3/4 cup Nutella

2 medium eggs

5 tbsp. All-purpose flour

1 cup ground pistachios

(Recipe yields about 9-10 brownies)

Instructions

1. Preheat oven to 350 degrees F. Line a 12 servings-cupcake tin with liner and set aside.

2. Grind 1 cup of pistachios in a food processor or a blender until they are well-ground (grind, grinded?) Be careful not to over blend though. Set aside.

3. Cream butter and sugar together in a bowl with a whisk or a hand-held mixer.

4. Add the eggs and continue mixing until well combined.

5. Add Nutella and continue to mix. This is the part where you switch to a spatula!

6. Sift flour (or not) into the mixture and fold with the spatula. Add the pistachios that you have set aside and fold into the batter.

7. Spoon the batter (or use an ice cream scoop) into the liners. Fill about 1/2 – 3/4 of the way. This recipe should yield about 9 brownie cakes. Bake for 15 minutes. No longer! The top should be semi-dry, and when you do the toothpick trick, well– it won’t really work because the inside will be gooey. Just a disclaimer. 🙂

8. Eat that sucker!

If you’re wondering where the baking soda or baking powder is, well I didn’t have any when I made these, and they turned out perfectly fine! I was actually surprised that they turned out the way they did (very moist on the outside, and gooey in the middle) considering the minimal ingredients. Then again, I am a college-student. No need/time to get fancy-schmancy with things. Hope you guys give it a try!

Image

Happy eating!

Let’s give it a try.

Just like with everything I get myself into these days, whether it be joining a club, learning an instrument, or volunteering, it seems like boredom plays a major role in these new endeavors. I guess trying new things just keeps me from becoming bored, and it allows me to be continually challenged in some way. I started this blog because one, I was bored and two, I wanted to try something new. From the title, one might assume that it is a cooking blog– which is correct! (and for the most part, this blog will consist of my own recipes, as well as tasty-lookin’ goods that I found on Pinterest and the interwebs– but mostly Pinterest). However, as much as I love, love, love, to cook, I also enjoy other things which, I hope, will be evident through this blog.